> ## Documentation Index
> Fetch the complete documentation index at: https://docs.sondos-ai.com/llms.txt
> Use this file to discover all available pages before exploring further.
# Web Widget
> Embed your AI assistant on your website with voice and chat capabilities
Add your AI assistant to any website with a customizable widget that supports voice calls, text chat, or both.
## Overview
The Web Widget allows website visitors to interact with your AI assistant directly through:
* **Voice conversations:** Real-time voice calls in the browser
* **Text chat:** Messaging interface for text-based interactions
* **Hybrid mode:** Seamless switching between voice and chat
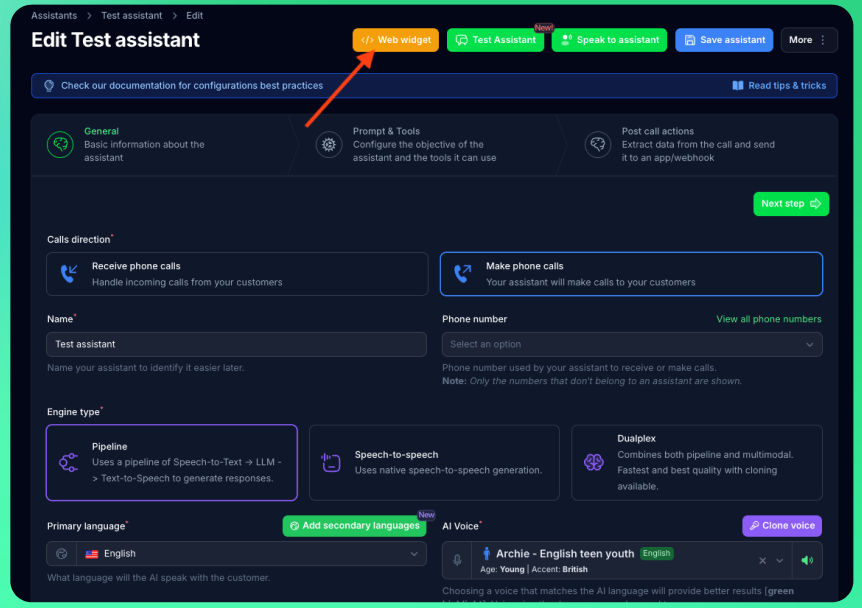
## Accessing Widget Configuration
1. Navigate to your assistant's edit page
2. Click the **"Web widget"** button (yellow/warning color)
3. The widget configuration panel opens with live preview
 Web Widget is a premium feature. Ensure your plan includes web widget access before configuration.
## Widget Modes
Choose how visitors interact with your assistant:
### Voice & Chat (Recommended)
Users can seamlessly switch between voice and text during conversations.
**Best for:**
* Maximum flexibility for users
* Accessibility (voice for mobile, chat for quiet environments)
* Complex interactions requiring both modes
### Chat Only
Text-based messaging interface only.
**Best for:**
* Customer support and FAQs
* Environments where voice isn't appropriate
* Lead capture and qualification forms
### Voice Only
Real-time voice conversations only.
**Best for:**
* Phone-like experience on website
* Voice-first use cases
* Hands-free interactions
## Configuration Options
### General Settings
Web Widget is a premium feature. Ensure your plan includes web widget access before configuration.
## Widget Modes
Choose how visitors interact with your assistant:
### Voice & Chat (Recommended)
Users can seamlessly switch between voice and text during conversations.
**Best for:**
* Maximum flexibility for users
* Accessibility (voice for mobile, chat for quiet environments)
* Complex interactions requiring both modes
### Chat Only
Text-based messaging interface only.
**Best for:**
* Customer support and FAQs
* Environments where voice isn't appropriate
* Lead capture and qualification forms
### Voice Only
Real-time voice conversations only.
**Best for:**
* Phone-like experience on website
* Voice-first use cases
* Hands-free interactions
## Configuration Options
### General Settings
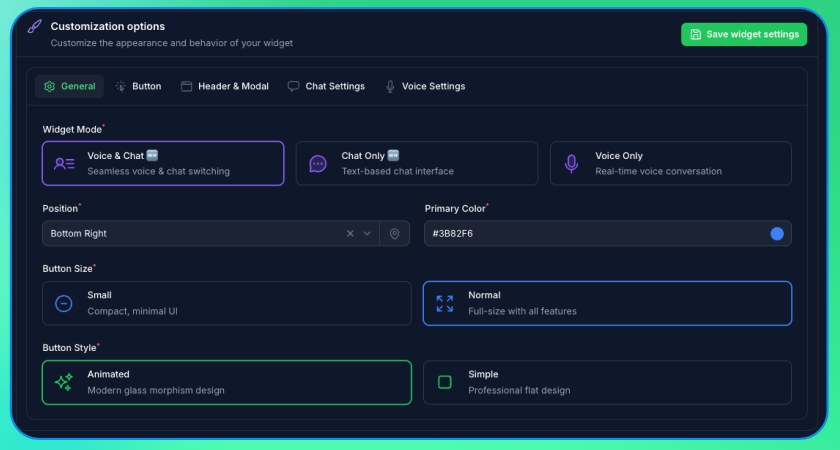 **Widget Mode:** Voice, Chat, or Voice & Chat
**Position:** Choose from 8 positions (bottom-right, bottom-left, middle-right, etc.)
**Primary Color:** Brand color for buttons and accents
**Toggle Button Size:** Small or Normal
**Toggle Button Style:** Simple or Animated
### Text Customization
Customize all visible text to match your brand voice and language:
**Header:**
* Header Title (default: "AI Assistant")
* Header Subtitle (default: "Ready to help you ✨")
**Toggle Button:**
* Button Main Text (default: "Need help?")
* Button Sub Text (default: "Chat with us")
**Modal (Voice Mode):**
* Modal Title (default: "Ready to chat?")
* Modal Description (default: "Click below to start your conversation")
* Start Button Text (default: "Start Voice Chat")
**Chat Interface:**
* Chat Placeholder (default: "Type your message...")
* Send Button Label
**Voice Interface:**
* Connecting Text (default: "Connecting...")
* Disconnect Text (default: "Disconnect")
* Error Text (default: "Connection failed. Please try again.")
### Pre-Chat Form
**Widget Mode:** Voice, Chat, or Voice & Chat
**Position:** Choose from 8 positions (bottom-right, bottom-left, middle-right, etc.)
**Primary Color:** Brand color for buttons and accents
**Toggle Button Size:** Small or Normal
**Toggle Button Style:** Simple or Animated
### Text Customization
Customize all visible text to match your brand voice and language:
**Header:**
* Header Title (default: "AI Assistant")
* Header Subtitle (default: "Ready to help you ✨")
**Toggle Button:**
* Button Main Text (default: "Need help?")
* Button Sub Text (default: "Chat with us")
**Modal (Voice Mode):**
* Modal Title (default: "Ready to chat?")
* Modal Description (default: "Click below to start your conversation")
* Start Button Text (default: "Start Voice Chat")
**Chat Interface:**
* Chat Placeholder (default: "Type your message...")
* Send Button Label
**Voice Interface:**
* Connecting Text (default: "Connecting...")
* Disconnect Text (default: "Disconnect")
* Error Text (default: "Connection failed. Please try again.")
### Pre-Chat Form
 Collect information before starting conversations:
**Form Configuration:**
* Pre-form Title
* Pre-form Description
* Submit Button Text
**Form Fields:**
Add custom fields to collect data:
* **Variable Name:** Internal variable name (maps to assistant variables)
* **Field Label:** Display label shown to users
* **Field Type:** Text, Email, Phone, or Textarea
* **Required:** Make field mandatory
* **Placeholder:** Placeholder text shown in the field
* **Helper Text:** Optional description below the field
**Variable Mapping:**
Form field names automatically map to your assistant's variables, making collected data available during conversations.
**Example Form Fields:**
```
Name: Full Name (required, text)
Email: Email Address (required, email)
Company: Company Name (optional, text)
Message: How can we help? (optional, textarea)
```
## Live Preview
The configuration panel includes a live preview showing exactly how your widget will appear:
* **Auto-updates:** Preview updates as you change settings
* **Real interaction:** Test widget functionality in the preview
* **Reset Data:** Clear stored data to test first-time visitor experience
Use the "Reset Data" button to test how your widget appears to new visitors. This clears all stored preferences and form data in the preview.
## Installation
### 1. Save Configuration
After customizing your widget:
1. Click **"Save widget settings"** in the configuration panel
2. Wait for confirmation notification
### 2. Get Embed Code
Copy the generated embed code from the "Embed Code" section.
### 3. Add to Website
Paste the script tag before the closing `` tag on your website:
```html theme={null}
Collect information before starting conversations:
**Form Configuration:**
* Pre-form Title
* Pre-form Description
* Submit Button Text
**Form Fields:**
Add custom fields to collect data:
* **Variable Name:** Internal variable name (maps to assistant variables)
* **Field Label:** Display label shown to users
* **Field Type:** Text, Email, Phone, or Textarea
* **Required:** Make field mandatory
* **Placeholder:** Placeholder text shown in the field
* **Helper Text:** Optional description below the field
**Variable Mapping:**
Form field names automatically map to your assistant's variables, making collected data available during conversations.
**Example Form Fields:**
```
Name: Full Name (required, text)
Email: Email Address (required, email)
Company: Company Name (optional, text)
Message: How can we help? (optional, textarea)
```
## Live Preview
The configuration panel includes a live preview showing exactly how your widget will appear:
* **Auto-updates:** Preview updates as you change settings
* **Real interaction:** Test widget functionality in the preview
* **Reset Data:** Clear stored data to test first-time visitor experience
Use the "Reset Data" button to test how your widget appears to new visitors. This clears all stored preferences and form data in the preview.
## Installation
### 1. Save Configuration
After customizing your widget:
1. Click **"Save widget settings"** in the configuration panel
2. Wait for confirmation notification
### 2. Get Embed Code
Copy the generated embed code from the "Embed Code" section.
### 3. Add to Website
Paste the script tag before the closing `` tag on your website:
```html theme={null}